SharePoint Workspace

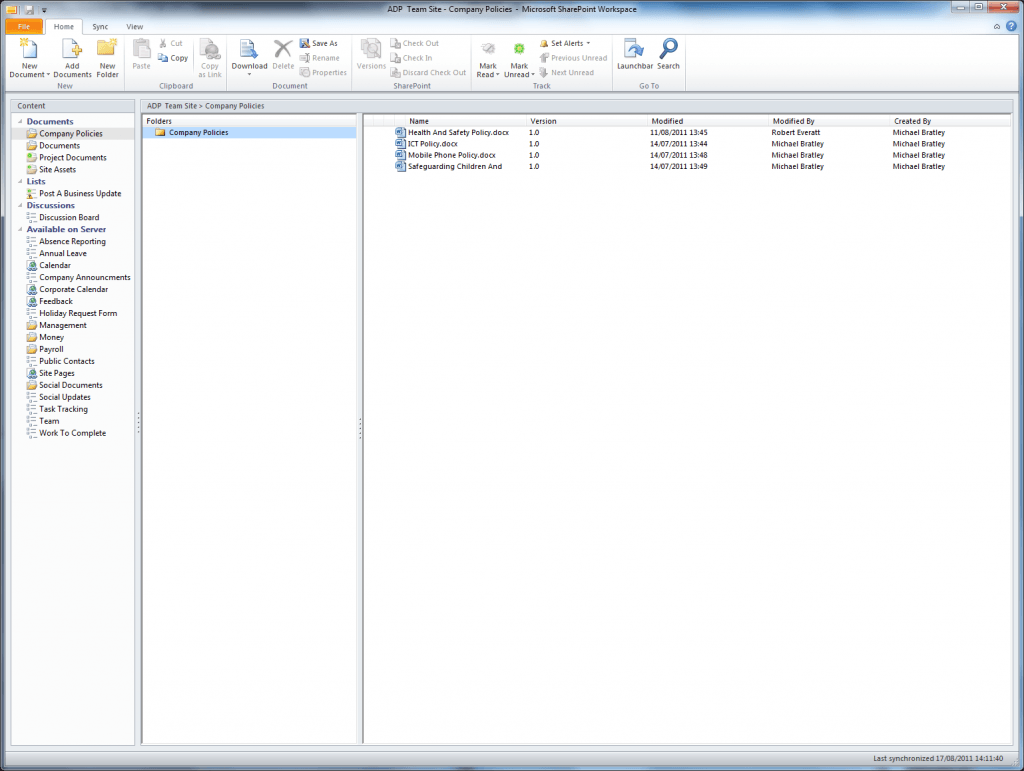
SharePoint Workspace is an easy to use tool that offers complete synchronisation of your SharePoint site to your desktop computer. This enables greater flexibility of how you access the things you need for your day to day work. This also means that you can access files when on the go and don’t have an Internet connection. If you made any edits to any documents while you are disconnected these will be queued for synchronisation until your Internet connection is restored. Another great feature is that when changes are made to a document, only the changes are synced back up to the server, meaning smaller and quicker upload times. Workspace also provides the ability to save to direct folders on SharePoint Servers as if they were folders on your local machine, making it both familiar and easy to save documents to the cloud with no new skills to learn. With it’s great integration with Windows you can even search for documents located on SharePoint through a Windows Explorer window, which makes it really easy to search for those all important documents.

However it does not support all content. There are some instances where data will not be synchronised depending on the way that it is stored on the SharePoint site, for example in a custom list.

Workflows in Office 365

Workflows have so far been overlooked in this project, so we thought it was time to find out a little more about them and how they can be used. If a Workflow was to be displayed in a graphical form it would look like a flowchart. A work flow follows a series of actions to automate common processes within a business. For example we have looked at a workflow for the process of authorising annual leave. Here the user makes their request through the team site, the workflow is started automatically when the item is added, and the ‘Approver’ is then notified and asked to either approve or reject the request. If the request for annual leave is approved, the requesting user is then sent a confirmation email. If the request for annual leave is not approved then the item is deleted from the list and the requesting user is sent an email explaining this. The great part about designing workflows is that they can be designed in Microsoft Visio, in a graphical form, then exported into SharePoint Designer 2010, which then creates the overall framework for you. All that is required then is to add in the specific parts of the variables, for example who to send the emails to etc. Workflows can greatly improve speed and efficiency with common tasks, and can also save money by cutting out the small tasks that would normally be carried out by people.

Creating the workflow itself was relatively easy, the Visio file was easy imported into SharePoint Designer and the appropriate selections were made for each stage in the workflow’s journey. Unfortunately, every time we uploaded the workflow into SharePoint it would not work what so ever. The workflow is started and the list item (the holiday request) says “In progress”. When viewed, office 365 says that it may be a bit slow due to a large amount of processing, 5 minutes later that message is replace with an error message. We aren’t sure if it is something that we are doing wrong or whether the Workflow we have created just isn’t compatible with Small Business, either way, it’s frustrating.

Update:

We have since found out the following, and it appears that some of the functions that we included in the workflow are not supported by the small business version.

The following workflow actions are not supported in Office 365 for small businesses:

Start Document Set Approval Process, Capture a Version of a Document Set, Send Document Set to Repository, Set Content Approval Status of the Document Set, Start Approval Process, Start Feedback Process, Start Custom Task Process, Declare Record, Undeclare Record, Lookup Manager of a User, End Task Process, Set Content Approval Status (as author), Wait for Change in Task Process Item, Set Task Field, Rescind Task, Append Task, Delegate Task, Escalate Task, Forward Task, Insert Task, Reassign Task, Request a Change, Send Task Email.

No workaround is available. To use these SharePoint workflow actions, you must have Office 365 for enterprises.

Update:

We have now managed to get the built in workflow, three-state workflow, to work after struggling to get it to function correctly, it just previously kept failing.
Microsoft Premier Deployment for Office 365

Microsoft Premier Deployment helps customers to make a safe and efficient transition to the cloud environment. Microsoft offer this service to Enterprise customers who plan to migrate 2,400 or more users. Microsoft offer two services, to either assist with the planning of the migration and then hand over to the organisation to implement the plan for the migration, or customers can opt to work directly with Microsoft’s deployment teams.

Microsoft will identify any issues with the computing environment that may need to be resolved to meet the requirements of Office 365 and provide a proposal to address any other gaps. To date Microsoft Premier Deployment has migrated over 2 million seats of fortune 100 customers to online services, using the standard tools their team uses.

Microsoft will also mitigate any migration and deployment risks with the help of an experienced deployment team, they will also manage your deployment budget by using a fixed price approach.

AvePoint

AvePoint is a third party tool that enables the final stage of migration from SharePoint Server 2010 to SharePoint Online and Office 365.

The AvePoint tool offers the following advantages:

  • Seamlessly migrate existing enterprise content from more than 14 legacy systems to SharePoint Online with a single install.
  • Minimize business disruptions caused by the migration or the deployment of change to sites, content, configuration, and solutions by maintaining co-existance of on-premise and online SharePoint deployments.
  • Reduce risks associated with migration from various disparate repositories or managing hybrid SharePoint environments.
  • Simplify testing, course correction and rollback during migration, deployment or publishing processes.
  • Publish content from the on-premise staging farms to the cloud for global scalability and seamless hybrid management.
  • Staged approach for migrating and publishing enterprise content reduces the number of connection paths required, helping to control bandwidth utilization and ensuring all network resources stay fully optimized.

More details can be found at: http://www.avepoint.com/sharepoint-online-migration-docave/

Migrate from SharePoint Portal Server 2003 to SharePoint 2007 Server to SharePoint Server 2010 (that’s quite a mouth full)

We now have a migration check list!

I have recently found an extremely useful document on Microsoft’s TechNet page that details the transition from Microsoft SharePoint 2007 Server to SharePoint Server 2010. This document can also be used to aid our transition in to Microsoft Office 365.

The document can be found here:  http://lncn.eu/jx7

If we are to upgrade to Office 365 by first upgrading to SharePoint 2007 and then to SharePoint 2010, these are the steps we would take:

  • Prepare to upgrade to SharePoint 2007
    • Determine how to handle customizations
    • Develop new custom site definitions and create upgrade definition file
    • Run the Pre-upgrade scan tool to determine compatibility
  • Prepare to upgrade to SharePoint 2010
  • Perform Pre-upgrade steps (see http://lncn.eu/hjz)
    • Install all perquisites
    • Run and test a full backup in SQL Server
    • Deploy upgrade definition files and new site definitions
    • Upgrade custom Web Parts packages
  • Create the temporary Office SharePoint Server 2007 farm
    • Download the software for the temporary farm (a trial version of SharePoint 2007 can be used if we do not have a full version as a trial version will last 180 days)
    • Prepare the 2007 environment (see http://lncn.eu/fp26)
  • Create the temporary SharePoint Server 2010 farm
    • As SharePoint Server 2010 is not our final destination we will only be setting SharePoint 2010 up as a temporary virtual server much like SharePoint 2007
    • As our method isn’t covered by the document mentioned earlier we will not be creating a full SharePoint Server 2010 farm but a virtual temporary one instead
  • Perform first upgrade (full details see http://lncn.eu/jvx5)
    • Ensure that the pre-upgrade scan has been used, the upgrade will not work otherwise
    • Back up the content databases
    • Restore the backed-up copies to temporary farm
    • Add the databases to the Web applications to start the upgrade process
    • Profile information will also need to be imported (see http://lncn.eu/guw2)
  • Verify the first upgrade
    • Review the upgrade log file
    • Review the transferred sites to ensure they have transferred properly
  • Perform the second upgrade
    • Use the pre-upgrade checker this time
    • Carry out the same actions as before to upgrade to 2010
  • Verify the second upgrade
    • Same as before

Once this is complete, the system will be ready to migrate into Office 365. Unfortunately I could not find any documentation for migrating to Office 365 amongst Microsoft’s documentation. I asked on the community website, one guy said that Microsoft have a list of partners that offer Migration services, these are people that will guide the user through the planning and migration to Microsoft Office 365.

Alternatively a third party application could be purchased such as AvePoint, Quest or MetaVis. These applications have the ability to migrate data from SharePoint Server 2010 to SharePoint Online, retaining all the customization and security settings. If the user were to migrate manually they may lose all content and security settings.

This document has been extremely helpful; it may have taken some time to find all this information without. Anyone considering upgrading their SharePoint server, I strongly recommend giving it a thorough read.

RE